Defining the floor's body and shapes
The floor will need a body and a more complex shape. Create the body is simple and it only has 2 noteworthy details: its mass doesn't matter and we won't add it into our space. That might surprise you, but if you think about it for minute you'll realize that since our floor is static (i.e. it doesn't move, ever!) then we can't add it to our space or gravity would push it down. For the same reason, setting the mass to any value would still be OK but it wouldn't have any practical effects. So, add this code at the end of the setupChipmunk method (you could add it before the creation of the ball's body and shapes with no negative effects):
// Create our floor's body and set it's position

cpBody *floorBody = cpBodyNew(INFINITY, INFINITY);

floorBody->p = cpv(160, 480-350);
So, now that we've a body, we need shapes. There are several ways of matching our image's layout, as I said in the Concepts section you can add several shapes to a body. So, in our case we could create several line segments or define a poly shape. I'll take the last approach because it's the more confusing if you're new to Chipmunk and/or programming in C.
 Poly shapes are powerful but they've some constraints in Chipmunk that you have to understand to correctly use them. The first thing you've to know is that you need to provide all the vertexes in a clockwise winding or, in another words, if you plot each point at a time for a circle, it would like it was a clock's hand moving. No image the same direction for a square or another shape and you'll surely understand the concept. The other thing you need to know about poly shapes in Chipmunk is that the points must define a convex hull. A convex hull is a shape where the line between any 2 points inside the shape will still be completely inside the shape. You can read more about the subject at Wikipedia or at this site.
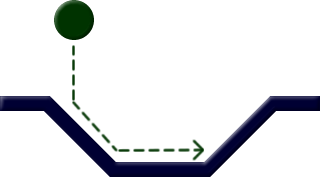
This means we wouldn't be able to define just one poly shape to correctly represent our floor (if you're using my images). To perfectly match it we'll need 5 poly shapes, so lets define them:
// Define our shape's vertexes

cpVect verts1[] = { cpv(0.0, 0.0), cpv(50.0, 0.0), cpv(45.0, -15.0), cpv(0.0, -15.0) };

cpVect verts2[] = { cpv(50.0, 0.0), cpv(116.0, -66.0), cpv(110.0, -81.0), cpv(45.0, -15.0) };

cpVect verts3[] = { cpv(116.0, -66.0), cpv(204.0, -66.0), cpv(210.0, -81.0), cpv(110.0, -81.0) };

cpVect verts4[] = { cpv(204.0, -66.0), cpv(270.0, 0.0), cpv(275.0, -15.0), cpv(210.0, -81.0) };

cpVect verts5[] = { cpv(270.0, 0.0), cpv(320.0, 0.0), cpv(320.0, -15.0), cpv(275.0, -15.0) };
When defining our shape's coordinates we need to consider Chipmunk's coordinate system. Our sprite, in this case represented by a UIImageView, is being positioned by its center, that same center is then considered the origin (0.0) of Chipmunk's coordinates system. Additionally Chipmunks coordinates' values increase when moving from the bottom-left corner of the screen to the top-right corner. The last fact is reflected on my vertex coordinates, notice how I used negative values to all the Y coordinates. Now all we need to do is add the shapes and make sure we set the offset of the vertexes correctly, in this case we adjust them by half the width and half the height of the image, effectively centering them around the image's center.
// Create all shapes

cpShape *floorShape = cpPolyShapeNew(floorBody, 4, verts1, cpv(-320.0f / 2, 81.0f / 2));

floorShape->e = 0.5; floorShape->u = 0.1; floorShape->collision_type = 0;

floorShape->data = floor;

cpSpaceAddStaticShape(space, floorShape);

floorShape = cpPolyShapeNew(floorBody, 4, verts2, cpv(-320.0f / 2, 81.0f / 2));

floorShape->e = 0.5; floorShape->u = 0.1; floorShape->collision_type = 0;

floorShape->data = floor;

cpSpaceAddStaticShape(space, floorShape);

floorShape = cpPolyShapeNew(floorBody, 4, verts3, cpv(-320.0f / 2, 81.0f / 2));

floorShape->e = 0.5; floorShape->u = 0.1; floorShape->collision_type = 0;

floorShape->data = floor;

cpSpaceAddStaticShape(space, floorShape);

floorShape = cpPolyShapeNew(floorBody, 4, verts4, cpv(-320.0f / 2, 81.0f / 2));

floorShape->e = 0.5; floorShape->u = 0.1; floorShape->collision_type = 0;

floorShape->data = floor;

cpSpaceAddStaticShape(space, floorShape);

floorShape = cpPolyShapeNew(floorBody, 4, verts5, cpv(-320.0f / 2, 81.0f / 2));

floorShape->e = 0.5; floorShape->u = 0.1; floorShape->collision_type = 0;

floorShape->data = floor;

cpSpaceAddStaticShape(space, floorShape);
This code should be pretty easy to understand now. It creates 5 shapes, all attached to the floor's body and then sets some properties. There are 2 minor differences between the way the floor shapes are defined and the previous ball's definitions. The first is a minor adjustment to the friction from 0.8 to 0.1, without it the friction between the floor and the ball would be so strong that the ball would lose too much velocity when in contact with the floor. The second difference is the way the shapes are added to the space, using cpSpaceAddStaticShape instead of cpSpaceAddSpace gives Chipmunk an hint that the shape won't move, Chipmunk uses this hint to optimize the calculations during each step thus reducing CPU usage.
If you run the project now, you'll see the ball falling but instead of passing through the floor, it will hit it and stop. While this is a good indicator that both shapes are interacting correctly, it doesn't provide the best demonstration of what we already achieved. Find the code were we create and setup our ball's body and check the position vector X value from 160 to 60:
ballBody->p = cpv(60, 250);
Now, if you run the demo again you'll see the ball starting a little bit more to the left, falling to the floor's inclination and then doing a very realistic movement through the floor.